Showing posts with label furniture. Show all posts

Thursday, May 14, 2015

Summer Re-Model

Ginger and I are working on a friend's apartment in Gramercy Park.  The space has wonderful potential, and we have been happily sending our favorite links for inspiration.  The apartment has two beautiful panels that are hand painted.  G & I wanted to accentuate what the space has so when we found a beautiful teal sofa at Dwell Studio, we knew we had our starting place. 


With the teal velvet in mind, I had a few more ideas for my space. I would love to find a pink velvet sofa for my place or paint the walls pink….. What to do???


Mil Besos,

Mel

Thursday, February 5, 2015

Dining Room Revamp: Louis Chairs

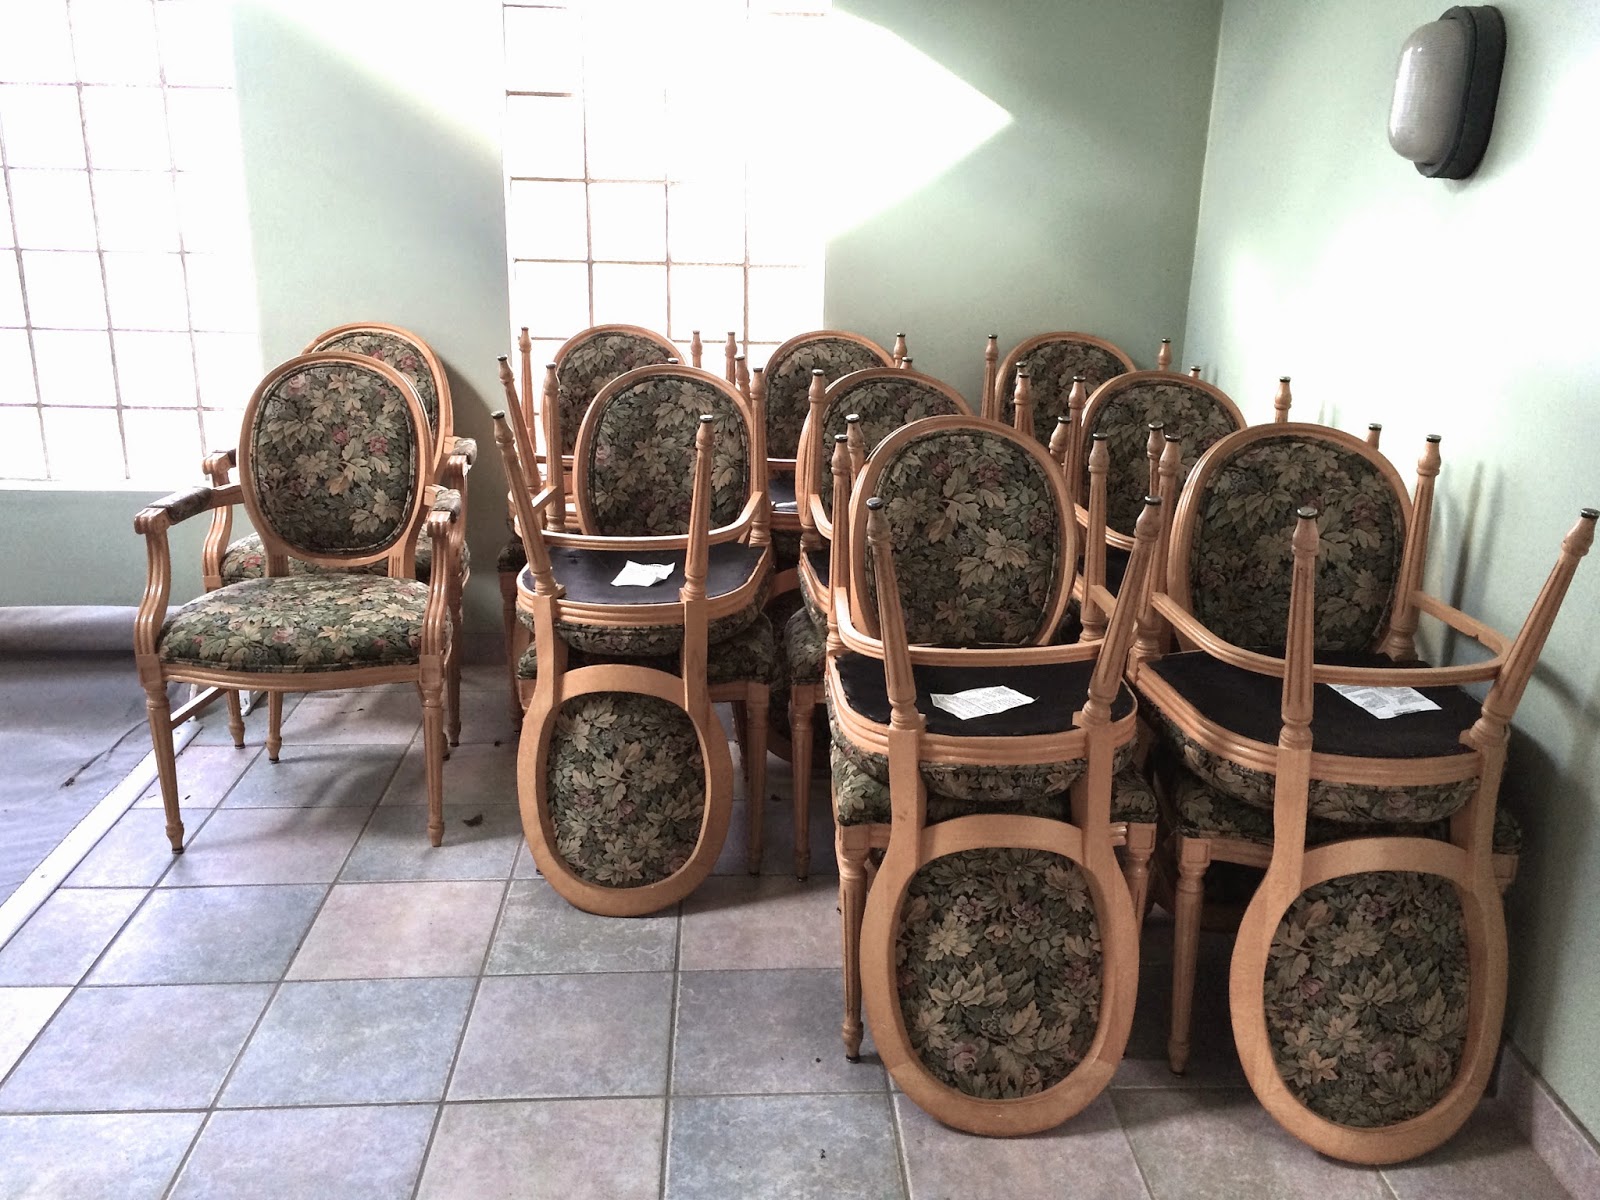
I have always loved Louis style dining room chairs, and someday upgrading our mismatched hodgepodge of different seating has long been on our wish list for the future.  Over the years I've kept an eye out at furniture stores and antique malls but have never found a large enough set (3 chairs does not count!) or a price that was low enough to justify them.  Until a couple of weeks ago.  While scouring Craigslist for another project, I found a guy selling a bunch of dining chairs from a church that no longer used them and needed the extra space.  Always up for a road trip in search of a great deal, Jady and I jumped in one of our church's 15 passenger vans and got on the road to Indiana.  


The crazy thing is, by the time we arrived, our guy had discovered even MORE of them, so that all told we came home with 18 Louis chairs!  And since he really wanted to get rid of all of them at once, we were able to negotiate a low price--  just about $30 a chair!


They are all in perfect condition and super sturdy, but they definitely need a makeover before they'll be ready for us to use.  Since we don't have a dining room table or a dining room space that can seat 18 people, I'll be dividing the chairs up into groups-- 4 for the kitchen table, 10-12 for the dining room, and a couple for extra seating around the house.  


Now we just have to pick a design!  Not painting the frames and leaving them as they are would obviously save me quite a bit of labor... so it's tempting.  But the light, yellowy wood isn't my favorite, so if we keep them as is I'll want to choose an upholstery color to downplay the yellow.  What would you do?  To paint, or not to paint?


xo

Liza

Wednesday, November 5, 2014

Garage Chic: Cheap Shelving DIY


At the back of our first floor we have a small extra room that can technically be counted as a bedroom, since it has a small closet and a bathroom nearby.  We don't really have much need for another bedroom at the moment, and honestly it's too small and awkward to lend itself to that use on a daily basis.  Until recently it was a catch all space for my painting supplies, wrapping paraphernalia, and even a few boxes that I just couldn't find the energy to unpack (yes, from two years ago!).  

Thankfully I knew once the rest of the house had been pretty much finished I would inevitably feel a surge of motivation to tackle this random little room and turn it into an office and painting studio area.  The first step was clearing out whatever junk had accumulated over time from laziness, and then I realized exactly what we needed: storage.  My painted gray desk from our Vienna days helps organize quite a bit of office materials, but it wasn't enough.  Not wanting to spend a bunch on mediocre bookshelves for this room, and also not interested in a two hour drive to IKEA this time, I decided to stop by our local Habitat for Humanity ReStore center, which sells a huge range of second hand home items.  This place offers a treasure hunt, with plenty of junk to rummage through but also the possibility of finding a cool light fixture, old french doors, a fireplace mantel (like I did here), or in this case, a shelving unit.


These basic metal shelving units you'd see lining the walls of a garage or basement seemed more interesting to me than a basic wooden bookshelf, so I brought home the largest one-- for 10 bucks.  


The whole thing was pretty grimy, and some sections of the shelves and the side rails had been rusted over time, so first off I used dish soap and water to scrub each piece well to remove any residue or dust.  I decided to spray paint it, and it's always hard for me to make myself do the cleaning/prep step in this process, but it's important!  So I waited (im)patiently while all of the pieces dried before beginning to paint.


Normal spray paint is wonderful at covering a multitude of problems, but with this much rust, I decided to bring in the big guns.  Rustoleum makes a special primer for rusted metal that seals in the problem and protects from further corrosion.  So all of the rails and shelves got a good coat of primer first.


I wanted to play with a more formal look as a foil for the industrial nature of the shelves, so I settled on a black and gold color scheme.  For the shelves I used a basic Rustoleum black matte spray paint, and for the rails I decided to go metallic with Krylon's "18k Gold Plate." 


Once everything was dry to the touch I tried to remember how to reassemble everything (the before photos I took were key here!), and I'm happy with the result.  I now finally have a place for our stationary and my oversized painting supplies, and our printer is no longer on the floor!  

The whole project took me a couple of days since I spread out all the steps, but you could definitely finish it all in one day, including dry time.  With all the spray paint I used up, my total came to about $35, including the original $10 for the shelves-- a pretty good deal!  And if we ever don't need them in the house, they can always glam up the garage a little:)


xo

Liza

Wednesday, October 8, 2014

Designing Jady's New Office

This summer has been one of bittersweet transition for us, as our beloved rector at church counted down to retirement and began to pass the baton to Jady.  As Robin and his wife, Mary, look forward to retirement, we're both excited about this amazing opportunity to serve in such a special church full of people we have come to love so much.

Just a few weeks ago, Robin and Mary celebrated their last Sunday, and he cleared out his office and officially passed it on to Jady-- so we're on our own now with BIG shoes to fill!

Not only is the rector's office symbolically significant for Jady to move into, it's the only space in the whole place with a shot at holding the man's absurd number of books!  His current office looks like a crazy book hoarder lives in there, and I even have a few boxes of them waiting at the house ready to be dropped off the moment the painters are finished.


I love Robin's office space, and to renovate we don't really have to do much to spruce it up.  The old can lighting was pretty low, so we're replacing those with more LED recessed lights overhead, dimmable for versatility.  We're also adding library lights to the tops of all of the built in bookshelves and tearing out the corner closet that was never used to make room for more book storage (it's never enough).  Then the painters will coat the trim in white, the walls in a pale green and the doors in a soft black.


Here's what we're thinking at the moment for decor.  Jady wants a soothing wall color, a mix of traditional and quirky elements, and some pops of more saturated color punctuating the space.  In addition to the seating area (we're using the current sofa, side tables and pair of black leather arm chairs), he'll have a reading corner with a wingback chair and standing lamp, so he can take advantage of all of those books.


I can't wait to show you the progress!
Stay tuned...

xo

Liza


Wednesday, October 1, 2014

The Look for Less: Fancy Finials DIY

I always find little surprises in a room extra fun, like a pair of these powder coated brass finials atop a couple of lamps.  As much as I love these, at $40 a piece I'm thinking maybe a DIY project could come close for less of a chunk of change.


A quick search on Etsy and eBay turned up a couple of good knockoff options, like this pair of chinoiserie brass finials at $17 ($25 with shipping).


Or you could take it up another style notch with this gorgeous pair, selling on eBay for $36 including shipping.


You could go with either of those sets of finials (or find your own!), plus a couple of coats of mint spray paint (on sale for $4.19), and you've created the look for significantly less-- at 1/4 to 1/2 the price!


xo

Liza


Thursday, September 18, 2014

Neutral Glam: The Look for Less

As much as I love fun patterns and bright pops of color in decor, there's always something wonderfully soothing about a subtly decorated, neutral space.  The key to keeping neutral from becoming boring is incorporating a variety of textures and tones (think linens, natural fibers and metallics all together) to keep things visually interesting.

The Look

For Less


Happy decorating!

xo

Liza

Thursday, August 14, 2014

Mid Century Finds

While in the Catskills, I love to frequent my favorite thrift/antique stores. Last week while a friend was in town we hit up a very cluttered shop and to my surprise found a little mid century treasure, and in a pair no less…..


I picked them up at 50 dollars each, which is a steal. They are in great shape and just need a little love. I am already dreaming up some fun ideas…..

via pinterest


via pinterest
via pinterest

We will see what fabulous fabric I have around the casa!


Besos,

M

Wednesday, August 13, 2014

STEP IT UP: FLOORS & WALLS

When ever I leave home, I can't help but obsess over areas in my home I would love to improve. Two of those areas happen to be the walls leading up to the second floor and our bedroom floors. The floor are in good shape, the staining of them is a little blah for my taste. 

So, well away the mouse will play…..


ALL IMAGES VIA PINTEREST

Obviously, I am always working towards a bargain, so stenciling myself would most likely be the most cost effective. There are so many great ideas out, help me out! What do you guys love and has anyone out there stenciled floors?


Besos,

Mel

Related Posts Plugin for WordPress, Blogger...