Showing posts with label Monday. Show all posts

Monday, June 23, 2014

All OVER the Place

That's how I feel about what I've been like lately!  While I am still painting and loving my work, these days I am not sure HOW to answer the question, "what do you do?"  Sometimes I paint portraits.  Sometimes I'm a decorator.  Sometimes I do reupholstery work.  And lately I've been working on a new project: planning a wedding.  A dear friend's wonderful daughter is engaged, and they've asked me to help some with the coordination, planning and execution of their big celebration weekend, and we are having the best time already!  Seriously, this mother daughter pair have so much style between them that I'm just along for the ride-- and how fun is that?  

(Here's the latest painting I just finished, by the way.)


In addition to any of the official (i.e. paid) jobs I take on, Mel and I both love to work hard for our churches.  We're both married to clergymen, and that means when we get to share with our minister husbands some of the excitement, planning, burdens and joys of what they do-- which is a perk to this job.  We're a team, and that makes all of it that much more fun.  It also keeps me busy ;-)

This weekend we got to enjoy another of the bonuses of clergy life: going to weddings!  Jady had the privilege of marrying the sweetest young couple from Louisville back in our old college town of Lexington, VA.  We got to celebrate two dear friends and their new lives together and revisit the old spots at W&L where Jady and I first met and dated.  All around a happy, romantic weekend.


xo

Liza

Monday, February 3, 2014

DIY TENTS

Now that we are into February, I have begun planning Henry's 4th birthday party. I love a party and dreaming up ideas is my favorite part of the process. When I asked H what he wanted for his bithday theme he was very clear in asking for an elephant party. Now, you remember last year's party when we created fun sock horses and popped up Ikea tents for his fiesta. This year, I have a few tricks up my sleeve. They involve homemade elephant masks and ears, along with a few tents for our friendly animals. 

The kiddos will be transformed into elephants, and lucky for us our friend Jackie is going to tell our guests a fabulous story then turn each child into elephants. Sounds like fun right?! So, while most people were making nachos and fabulous snacks before the Super Bowl, Jeremy and I were busy bees building little casas for Henry's party. 

Now, the challenge over the weekend was to find my materials. I went to my favorite fabric store in the city, Mood, but sadly it was closed. What to do? I decided to go through my closets and piles of "someday" fabrics, and pull something together. I love a project that involves repurposing materials in your home. It  just feels right. In the end I did not buy any new fabric and only purchased wood from Home Depot. 


For each tent I spent just $14.00 in materials. Before I decided to make my own I looked at several sites and found the cost of similar tents well over a $100, which was more then I was interested in spending. 

Just a note, you can choose to use fewer wood pieces, but I wanted to make sure my fabric was taut and our tents were stable. When you have a dozen four year olds playing in tents you want to make sure they are sturdy. I promise you, this project was so simple, complete in an afternoon, and Henry is already enjoying his birthday present. 

The best part is, you can fold the tents and tuck them under a full sized bed, so if you think you don't have space for such a thing like most New Yorkers, you can easily tuck the tent away whenever you like. 


Come back Wednesday for our tent reveal.

Happy Monday!!!


MEL

Monday, November 18, 2013

Some Finishing Touches on the Deck


With all of this exciting work going on in the back yard recently, I knew the time had come to get myself motivated to finish the deck.  The next step toward being 100% done with this monster project is to build and install lattice screens for the base, which will help the whole thing look more polished (and it will hide the mounds of dirt that we never smoothed out underneath). Once all of the beds are cut and the bushes planted, it will be much more challenging to get the lattice panels into position, so this landscaping project was just the thing to get me back to the saw:)


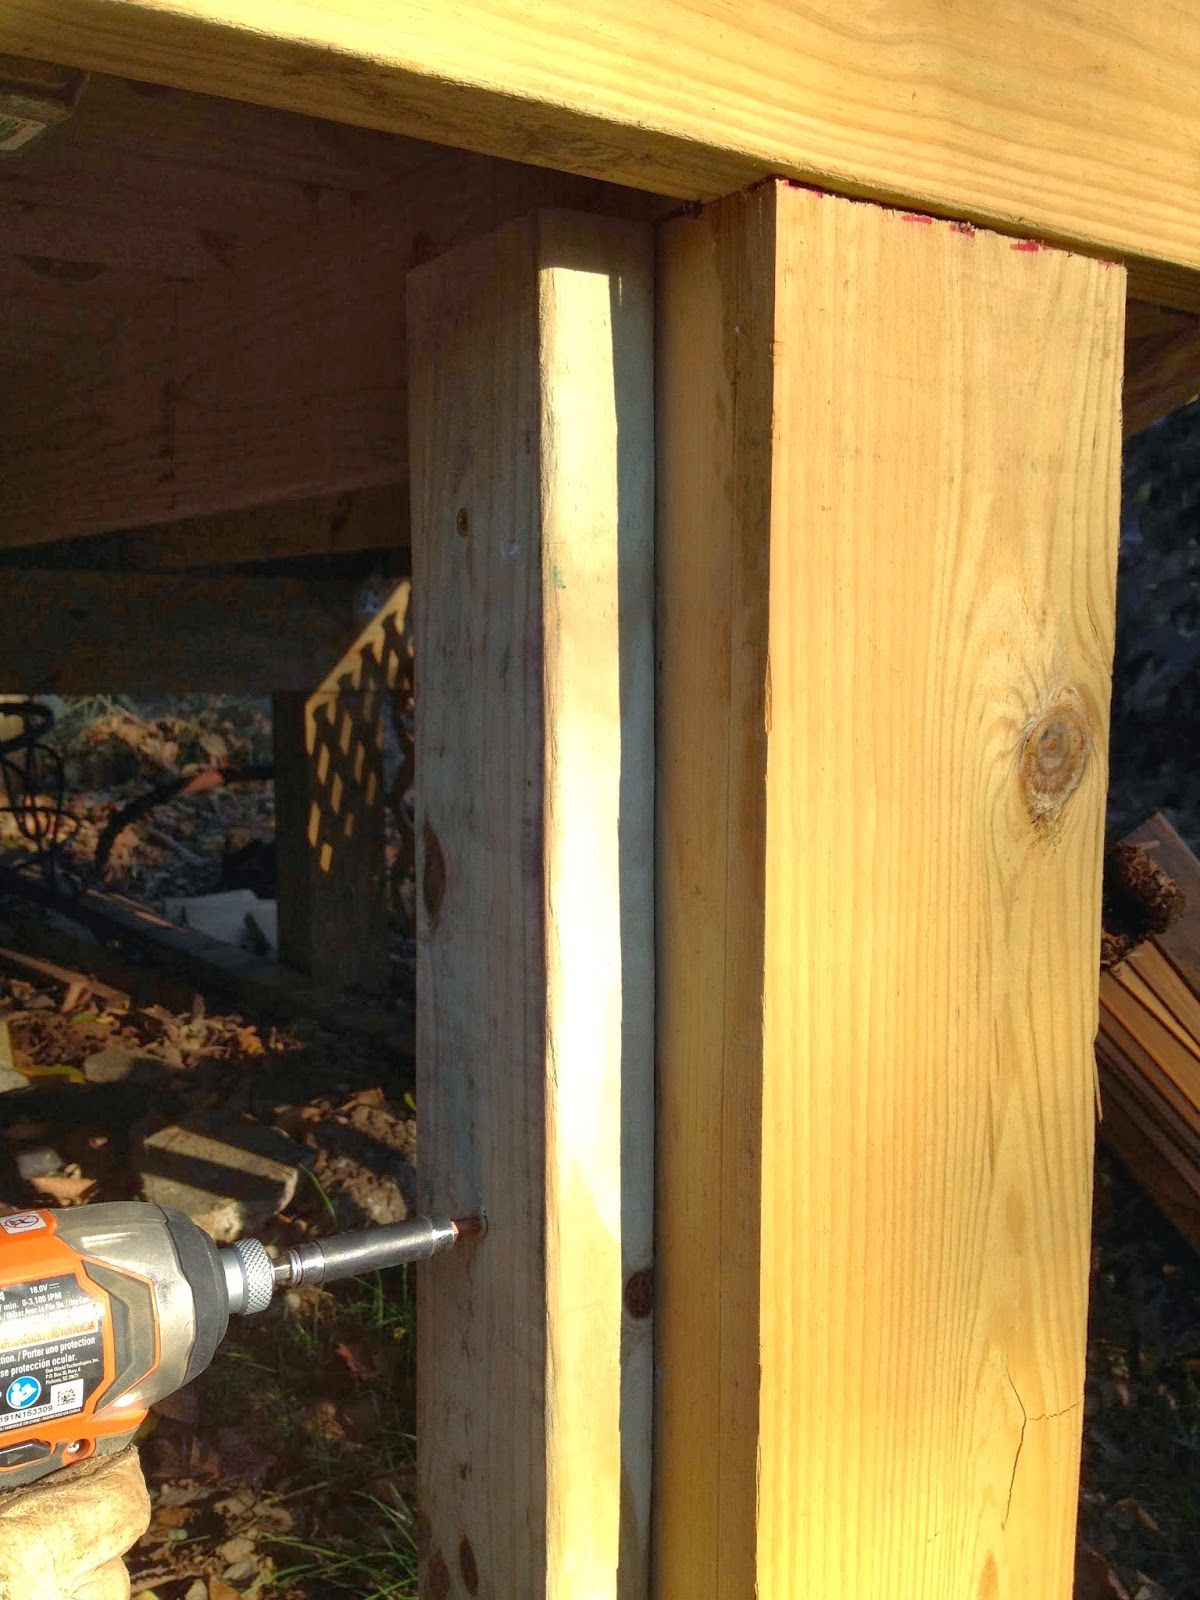
I decided to set my sections of lattice back inside of the support posts so that they would be flush with the outside edges of the deck rather than stick out beyond, which I think would look tacked on.  I first drilled sections of spare lumber-- 2x4s or 2x6s) two inches back from the edge of each post to provide a backing for the panels and something to drill into.


Then I measured each opening carefully, taking into account the fact that the lattice should clear the ground by an inch or two.  Of course each opening was a totally different size (great planning on my part:)), so each panel was measured and created separately.  I created a simple frame out of pressure treated 1x4 boards, connected by galvanized angle brackets for stability.  Once I had double checked that the frame would fit correctly inside the opening, then I cut each section of lattice with a jigsaw and screwed it onto the back of the frame.


The trickiest section was the little angle pieces for under the stairs, but thankfully my angle tool came to the rescue.  Otherwise it would have taken ages to get those angles right!  In one day I managed to finish seven panels... but now I need to motivate for the last few:)  Still, progress is progress, and I'm pleased.


Happy Monday!


Liza

Monday, November 11, 2013

Making Progress in the Back Yard

Over the past couple of days our back yard has started its makeover!  Our team of guys have already torn out and haul away the huge grasses that were in the way (so glad they're gone!), cut the beds for the new trees and bushes, and delivered our first installment of plants.  


Since the weather these past couple of days has been gorgeous-- sunny, crisp and even warm-- I decided it's probably time for me to refocus my attention on actually finishing this deck.  Since we got it ready enough to use for a party back in September I haven't lifted a finger to try to finish it, but now's the time!  The freezing temperatures that the weather man is predicting are motivating me to pick up that drill.  First up: I'll tackle the lattice panels that will cover up the base of the deck.


Happy Monday!

Liza


Monday, September 30, 2013

DIY Deck Railings

We had a fun weekend, and I hope you did, too!  The weather lately has been amazing, so I have taken advantage of these sunny, cool days by getting outside as much as possible-- weeding, playing golf, and (of course) working on the deck.  After building the main platform and then the privacy screen I moved on to the railings.  


 Figuring out the right design had me stumped for a while there, since both of my books and most of what I could find out there on the internet describes how to build this one style of railing that I'm not crazy about... The advantages are that water drains well since there aren't any flat surfaces, and it's easy to build, but I just couldn't get excited about this look, so I kept searching for clues on how to build what I do like.  Here's the easy version of railings, with the posts attached to the outside of the deck. 


After digging up a few inspiration photos I worked on figuring out how to recreate this look.  I love how clean the whole thing appears with the posts set inside the frame of the deck (something I knew I wanted early on enough to install them before laying the decking boards-- you really have to think ahead on a project like this!  Makes my brain hurt...:)), and I like the wide handrail at the top punctuated by post caps.


The first step was to install the 2x6 wide hand rails on top of the vertical posts all the way around, and then for each section of railing I screwed in a 2x4 as the bottom support, making sure it was level and at a uniform height (in my case about 3 1/2 inches off of the floor).  Then the tricky and time consuming part was assembling the inside sections, each created out of a 1x2 slat across both top and bottom, connecting the balusters together.  Each section of railing varies in width from the next, so each insert had to be designed specifically for that space, which ended up being a real project of precision.  And cutting.  So much cutting.   


Building the main sections of railing actually flew by once I got the hang of things and found a system that worked for me, but the trickiest, most brain-challenging part was doing the stairs.  Checking and double checking my angles (and still having to redo a couple of things-- hey, it happens:)) was again made so much more fun by my handy angle finder tool.  This thing absolutely saved me and kept me from throwing in the towel when facing this part of the project.


I'm not quiiiiite finished with all of the railing work yet, as you can see in the photo below, but I couldn't wait to share my progress with you!


xo

Liza

Monday, June 10, 2013

Monday Projects

Hi All, sorry to be a little MIA, but we are prepping for Creative Arts Camp, a move, and the end of school year of our ninos. First up today, Nia is back and sharing fabulous summer projects, we are  which furniture stays and goes, and in between we're packing boxes. 


Stay tuned for our upcoming moving projects!!


Mel

Tuesday, April 23, 2013

Reunited

We just returned home on Saturday night from a wonderful trip to NYC for the Mockingbird conference (a fabulous organization--check out their website here), which is always a reunion with old friends and a happy blur of great conversation.  Whenever we make a trip to New York we try to squeeze in as much time as possible hanging out with Mel and her husband, Jacob, who are our dearest friends and so much fun to spend time with.  I'm already looking forward to my next trip in June, when Mel & I will be attending the Alt conference together!


xo

Liza


Tuesday, April 2, 2013

Super Fast Guest Room Turnaround

Last week Jady's parents decided to take on the long drive from Baton Rouge and join us here in Louisville for Easter.  We were so excited to have them here with us, especially since this was their first visit since Lindsay moved here, too, and it's fun for her to show off her new hometown (and for them to take us out to eat! We all love that part!  :) )
We considered having the Kochs stay in a hotel during their visit, since Lindsay has moved into the guest room, and the other room was still functioning as our storage and workroom.  The whole thing was covered in dust and full of power tools, cans of paint and unpacked boxes that we just can't bring ourselves to sort through.  On Monday morning I decided that in order to house everybody all together I would try to tame the mess and create something livable for Lindsay to sleep in during the Kochs' visit.

Here is a shot of the room from before we bought the house.


We had the old carpet ripped out throughout the second floor including this room, which left the old, previously painted pine floors exposed.  Because we knew we would be repainting them later, we didn't have to worry about drips, spills or dust on the floor in here, and this spare room quickly became our workshop... not exactly inviting for a guest to stay in:)


My first step in turning this room around quickly was to move everything into the middle of the room so I could easily paint the walls and floor.  All along the perimeter of the room tacks and staples were sticking up out of the wood from where the carpet had been attached, so I carefully removed each one with pliers before sweeping and mopping to prep for the primer.  Once the primer was dry I could paint the floors using the same espresso color we chose for the upstairs hallway and Lindsay's room.


When we had the textured ceilings smoothed down, the plaster splattered all over the walls, which meant every room needed to be repainted.  The previous color in here was a dark blue, so I went ahead and primed everything to ensure even coverage of the new color.


Here is a shot that shows the contrast with the newly painted floors and the old unfinished section.  I only painted what would be exposed and left the inside as is-- no need to over work myself:)


The rug is a great hand me down from my parents, and I love that it used to be in my old room from their house.  The layout of this space is a little strange, since the door cuts into the room at an angle, which means that a custom cut carpet would probably do better in this space eventually.  But for now I'll enjoy the fish rug.  

The pretty green slipper chair is another cherished hand me down, this time from my grandmother.  I always remember it as such an elegant addition to her bathroom and dressing area, and I love having it here as a reminder of her. 


It's hard to tell from these photos, but I painted the walls a pale green, Behr's "wisdom," which is such a calming, soothing color.  We've already used it in a couple of rooms in the house, and since I hadn't decided what to do with this room, I stuck with a color I knew I loved.  As much as I accomplished in three days pulling this room together, we still have a huge, unsightly pile of boxes and tools shoved into the corner... Just ignore that!


I bought the floral fabric on the little chair and the twin headboard years ago, and it is still one of my absolute favorite prints.  I have no idea who makes it or what it's called, so I haven't ever been able to find it again!  I just love the colors and the big, bold flowers; it makes me happy every time I see it.


And here's my new gold mirror!  Hopefully its good looks are distracting from the pile of mess next to it.  The chest of drawers we got for free, since it was left in the garage when we bought the house.  We brought it in so this room could have some furniture, and after a very thorough scrubbing with clorox wipes it was as good as new!  It's not the most beautiful chest of drawers ever, but the price was right, and maybe down the line it'll get spruced up with a paint job.


The next project I want to tackle in this room is to paint the mantel to match the trim (like the one in the dining room) and to paint and add molding to the hollow closet door.  There's always something fun to do around here!


Happy Monday!

Liza


Related Posts Plugin for WordPress, Blogger...