Thursday, October 31, 2013

Get a Clue...

Since we were hosting a Chocolate Mystery Party I wanted to find interesting keys as our clues.  I looked in a variety of stores and just didn't find the right detailing for our clues, that is until I ran across some fun keyed patterned paper at Paper Presentation. The paper was a must purchase, and in the end the key paper went a LONG way.....

The idea was for the girls to find clues throughout the house. They could identify a clue when they found a key symbol. One request S made was to have detective hats. When I looked into making that purchase, I knew they were out of budget and thought of a way to simplify while tying our clue theme together. I simply cut out keys glued them to diamond shaped patterned paper then glued them to our party hats. I love how they turned out well within our party budget. 


Wednesday, October 30, 2013

Fun Home Gadgets


When we first moved into this house last year we decided to try out what sounded like a fun new home gadget and replaced the old thermostats with new ones made by Nest.  I never really thought I could love something as boring and usually ugly as a thermostat, but these things are small, streamlined and easy to program and adjust.  Both of our Nests connect to each other and our phones through wifi, and over time they can track your preferences and how often when you're home in order to lower your energy bill and make your house more efficient.  And the best part is, I don't even have to get up to change the temperature;) 


Now Nest is coming out with a new home gadget that I am dying to buy.  All of that creative, problem solving energy that somehow made thermostats exciting has now been focused on smoke detectors.  


Normally I detest smoke alarms.  Hate them.  They're ugly, they're impossible to stop before major hearing loss if they go off, and somehow the piercing signal alerting that the battery is low only sounds in the middle of the night.  If Nest can manage to create a smoke alarm that doesn't make me want to drive over it with my car, then I will buy it for sure!  According to the descriptions and the reviews coming out, it sounds like they may have done it.  

Like the thermostats, the smoke alarms connect to each other wirelessly so that if a problem is detected in the living room, all of the units go off.  Rather than provoking heart attacks with a shrill alarm immediately, the Nests first announce calmly that smoke is detected and tell you where.  And when you want to turn it off, no need to risk your life on a ladder-- just wave your hand up in front of it.  

To solve the problem of the change-battery-now earsplitting alert, the geniuses at Nest created a soft light on their units, which simply changes from green to yellow when the power is low.  

Who knew a smoke detector could actually be exciting? :)

xo

Liza


Tuesday, October 29, 2013

Mystery Party: Part One

Hello!!!  We have made it to the other side of Sophia's Chocolate Mystery Party. We had so much fun. A little confession, I don't always love going to kids parties, so when I was dreaming up Sophia's birthday party I began to think of a setting both moms and kids would love. With that in mind, I drew inspiration from the film, Chocolate.  I dream of attending a dinner party in the garden with chocolate as our main course. 

So, I knew the setting had to be killer and a quick draw for everyone.  Let me tell you, I had so much fun dreaming up the party and all the small details. A few of my favorite details to any birthday is excess.  I say go over the top in balloons, candles, and get the details just right. 


Monday, October 28, 2013

Update & a New Project

Hey!  So last week was a crazy one, and I know I disappeared from around here entirely...  We found out last weekend that my sweet, 94 year old grandfather died, and we had a quick turn around to pack up and drive back to my hometown (Raleigh, NC) for the funeral and a few days with family and friends.  Thanks for being so patient while I was gone, and it's nice to be home.

Before we left town we had started up a new project (my favorite phrase:)) that we'd been plotting for a long time but just hadn't had the chance to tackle: crown molding.  I love the refined, finished feel that crown can add to a room, and I have started noticing the variety of shapes and thicknesses out there that range from simple and modern to graphic to crazy ornate and opulent.  Thankfully Jady loves molding as much as I do (maybe more!), so from the minute we bought this house we knew we would eventually want to add some ourselves.  Although we definitely have dreams of installing it throughout the entire first floor (or maybe the whole house?!), realistically I knew that amount of work could overwhelm us, so we decided to start with one room and see how it goes.  First up: the living room.


Instead of simple crown, I wanted a wider, built up look, which is more difficult to install (of course- sorry, honey:)).  After a little research on building multi level arrangements, I decided on a three piece crown molding, which takes more time than single piece but isn't wildly complicated.


In order to create the built up look I wanted at the lowest cost possible I priced several options all the way from buying a single super wide foam piece to using the least expensive stock moldings available.  In the end I decided to use a Pro Pak of small, simple base molding from Home Depot for both the wall and ceiling sections, which is discounted because you're buying in bulk.  With the money I saved on that, I decided to splurge a little on a wider crown molding of 5 1/4" instead of the less expensive 3 1/4" option to give us an overall larger finished product that I think will fit better proportionally with the high ceilings on the first floor.


In the end this project will cost us about $2.79 per linear foot, plus a little extra for excess scrap wood, which means the living room should come to a total of about $170!  Not bad for an improvement I know we'll love.  

Now we just have to FINISH it ;)

xo

Liza


Friday, October 25, 2013

DIY Costumes

For the past month Sophia has been saying she wanted to be a Mariachi for Halloween. We are originally from Arizona, so I thought no problem-- I am sure my family will be able to track down an authentic costume. To my mother's disappointment, the quest for the perfect Mariachi costume led us to ordering an expensive costume from Mexico City.  After a few shipping complications we went back to the drawing board. 

My mother and I then came up with a chic Mariachi outvia via Zara kids. I love the look and I am pleased she can wear it in the coming year. 

Wednesday, October 23, 2013

A Mystery Party....

We are in full preparation of Sophia's Chocolate Mystery Party. I can't wait to share all our after photos next week. For now, let me start with saying that Trader Joe's is the best source for a variety of chocolates.  I found chocolate covered chips, oranges, mints, and much more. When I was collecting interesting chocolates I paid a visit to Party City. There I found chocolate Sixlets in a variety of colors. Sophia's favorite color is turquoise, so when I found turquoise chocolates I knew I had to buy them. On my chocolate hunt, I found chocolate covered spoon at Jaques Torres shop. I am so thrilled for Sophia's chocolate mystery party, because I know she is going to love find beautiful chocolates. Who wouldn't love a chocolate hunt?

Not only will Sophia's friends solve a mystery they will take home spy glasses, spy pens, spy pads, and much more. I think I am just as excited (if not more than) S.

Here are a few clues to what is ahead.....


Monday, October 21, 2013

How to hang.....

I have had so much fun putting the details together in our home.  One spot that makes we smile is the gallery wall in our living room. I finally am able to display our favorite pieces where everyone can enjoy them. 

When I was first facing the daunting blank wall, I was a little intimidated. I thought first I ought to find one large piece of art or photography to cover our space, but that idea became overwhelming too.  How could I chose one item for such a large space. Then slowly but surely our wall came together with odds and ends. I scored big time with the center oil painting which was framed. I picked up this favorite for only forty dollars. I was so pleased with this find. 

Once I had all my pieces together for display I hung and rehung until the wall was just right. My friend Ginger helped along the way-- she helped me rethink and restructure the design a few times. It is always easier and more fun to hang your gallery with someone you trust. 

Liza and I talking through the large space, so many options.....


Friday, October 18, 2013

A little turquoise....

When I was dreaming up decor inspiration for the kids' bedroom I turned to Sophia for her personal opinion.  One request she had was to include turquoise details throughout her new space.  I decided to spray paint turquoise details to our Ikea bunk beds and found some fun knobs from Anthropologie to replace our dull dresser knobs. 


Besos,


Mel

Wednesday, October 16, 2013

DIY Pelmets

For a long time now I have been planning on installing some kind of window treatment in the kitchen, where the one big window we have has been looking pretty bare.  Hoping to do something simple and cost effective, I remembered Jenny's post a while back about DIY pelmets and decided to try it myself.


To create the wooden frame for the cornice, I picked up 6" boards from Home Depot for the top and sides and used some left over plywood sitting in my huge stack of extra wood from other projects.  While I had measured the little space between our hanging cabinets and the window frame before I left, it turned out that the 3/4" boards I bought were too thick to squeeze in there, especially with the extra batting and fabric... so I had to improvise a little and ended up making do with some more scrap plywood pieces only 1/2" thick.


After a little online research into pelmet (or cornice board) designs, I ended up choosing one with pretty simple lines but also a little notching for interest.  Why make it too easy for my first try, right? :)  Once I had chosen my layout, I cut out the shape I wanted on a piece of paper and traced it on each end to be sure the two sides would match.  Then a quick run through with the jigsaw and I was ready to assemble.  I used a finish nailer to attach the frame and the front of the cornice all together and then switched to my pneumatic staple gun before beginning the upholstery part of the project.


Once the frame was built I hung it temporarily on the window to be sure the dimensions worked proportionally with the window and that it would actually fit around everything before moving on to the upholstery.


I doubled up the batting around the frame to ensure a cushy, forgiving base for the fabric, wrapped it around the edges and stapled it in place.


Most upholstery fabrics don't come in sizes as wide as I would have needed for this window-- 77"-- so I didn't bother looking.  After browsing through plenty of fabric shops for ideas, in the end I went with a piece of taupe and robin's egg blue trellis fabric that my mom gave me a couple of years ago.  I always loved it but never had just the right use for it until now.  After carefully pinning two edges together and matching the pattern as closely as possible, I stitched it down to create one larger piece of material, wide enough to cover the whole pelmet.


The most important thing I tried to keep in mind when stapling the fabric in place was to keep the pattern straight, pulling the material taught (but not too tight, so it doesn't pucker).  Once the main body of the box was finished, I needed to attach a panel of fabric somehow to the inside sections of the side pieces, where you can see easily standing near the window.  The staple gun can't reach down far enough to the corners to create a clean look, so I used a technique I've seen before in furniture upholstery: I cut long, thin sections of sturdy cardboard and stapled them into place at the back of the side sections.  Then all I had to do was fold the edges, pull the pieces around and staple along the back where the pelmet meets the wall.


Even with this window being so wide and the extra step of pulling out the sewing machine, this whole project only took a half a day (not including my near-daily trip to Home Depot, which is just a given:)).  I'm excited to have such an easy, fun project for sprucing up windows up my sleeve, and I'm thinking some other rooms might need an update on the next rainy day! Have you ever made your own pelmets?


xo

Liza

Tuesday, October 15, 2013

A birthday sneak preview

I love a party, and birthdays are no different. I have begun dreaming up Sophia's 6th birthday over the last two weeks. I will let you in on a few of the birthday details...
Lets see if you can guess what our theme this year will be.


One of my favorite details of Sophia's party is putting together her birthday outfit. I am sure I will only be able to get away with picking out the outfit for a few more years. In the mean time I love to head to Zara's. Sophia loves a pair of boots, so every year I buy her a new pair as part of her look. I also know Sophia wants to be comfortable to run around and play. That is why I picked stretchy pants this year. The outfit would not be complete without a "detective" coat to finish the look. I know she is going to love the fall coat, and I just wish they carried them in my size. 
There will be more details to come next week!

All the clothing sources are from Zara Kids.


xo,

Mel

Friday, October 11, 2013

Update on Apartment Decorating

Remember this cute student apartment that my friend, Vivian, asked me to help decorate?  We have had the best time exploring antique shops, furniture stores and second hand places all over town to find the right pieces for her new town house-- and we are nearly finished!  We're waiting for a few more things to come in, and then I'll post lots of before and after photos.


In the meantime, check out are some of our great finds for the apartment.  Our goal was to make the space comfortable and inviting, with a relaxed but still grown-up feel.  We wanted a mix of understatedly elegant pieces, rustic finishes, natural fibers and comfy seating-- and it will all be finished off perfectly with some of Vivian's gorgeous artwork we get to hang all over the place!  

I absolutely fell in love with this English inlaid wood flip top table.  In love.  And thankfully so did Vivian:)  This we are going to use as a front entry/hall table, so it will be the first thing you see when you walk in the door.


Most important purchase of the whole place: the couch!  We spent a lot of time looking at our options for the sofa, and we ended up with this comfortable, understated beige linen one from Colonial Designs here in town.


When we first began the shopping process we didn't really have much of a plan in mind for Vivian's dining room table, and sometimes it pays to keep an open mind.  Walking through a huge antique warehouse stuffed with furniture, this gorgeous table jumped out at both of us, and we couldn't stop thinking about it.  You know, when you find yourself comparing everything else to it?  Once we realized this was THE table, we simply adjusted the rest of the design for the room around it.  Because it's just that gorgeous.


 Across from the sofa we're using a pair of these leather club chairs.  Their smaller profile fits the space perfectly, keeping the sitting area from feeling overcrowded.


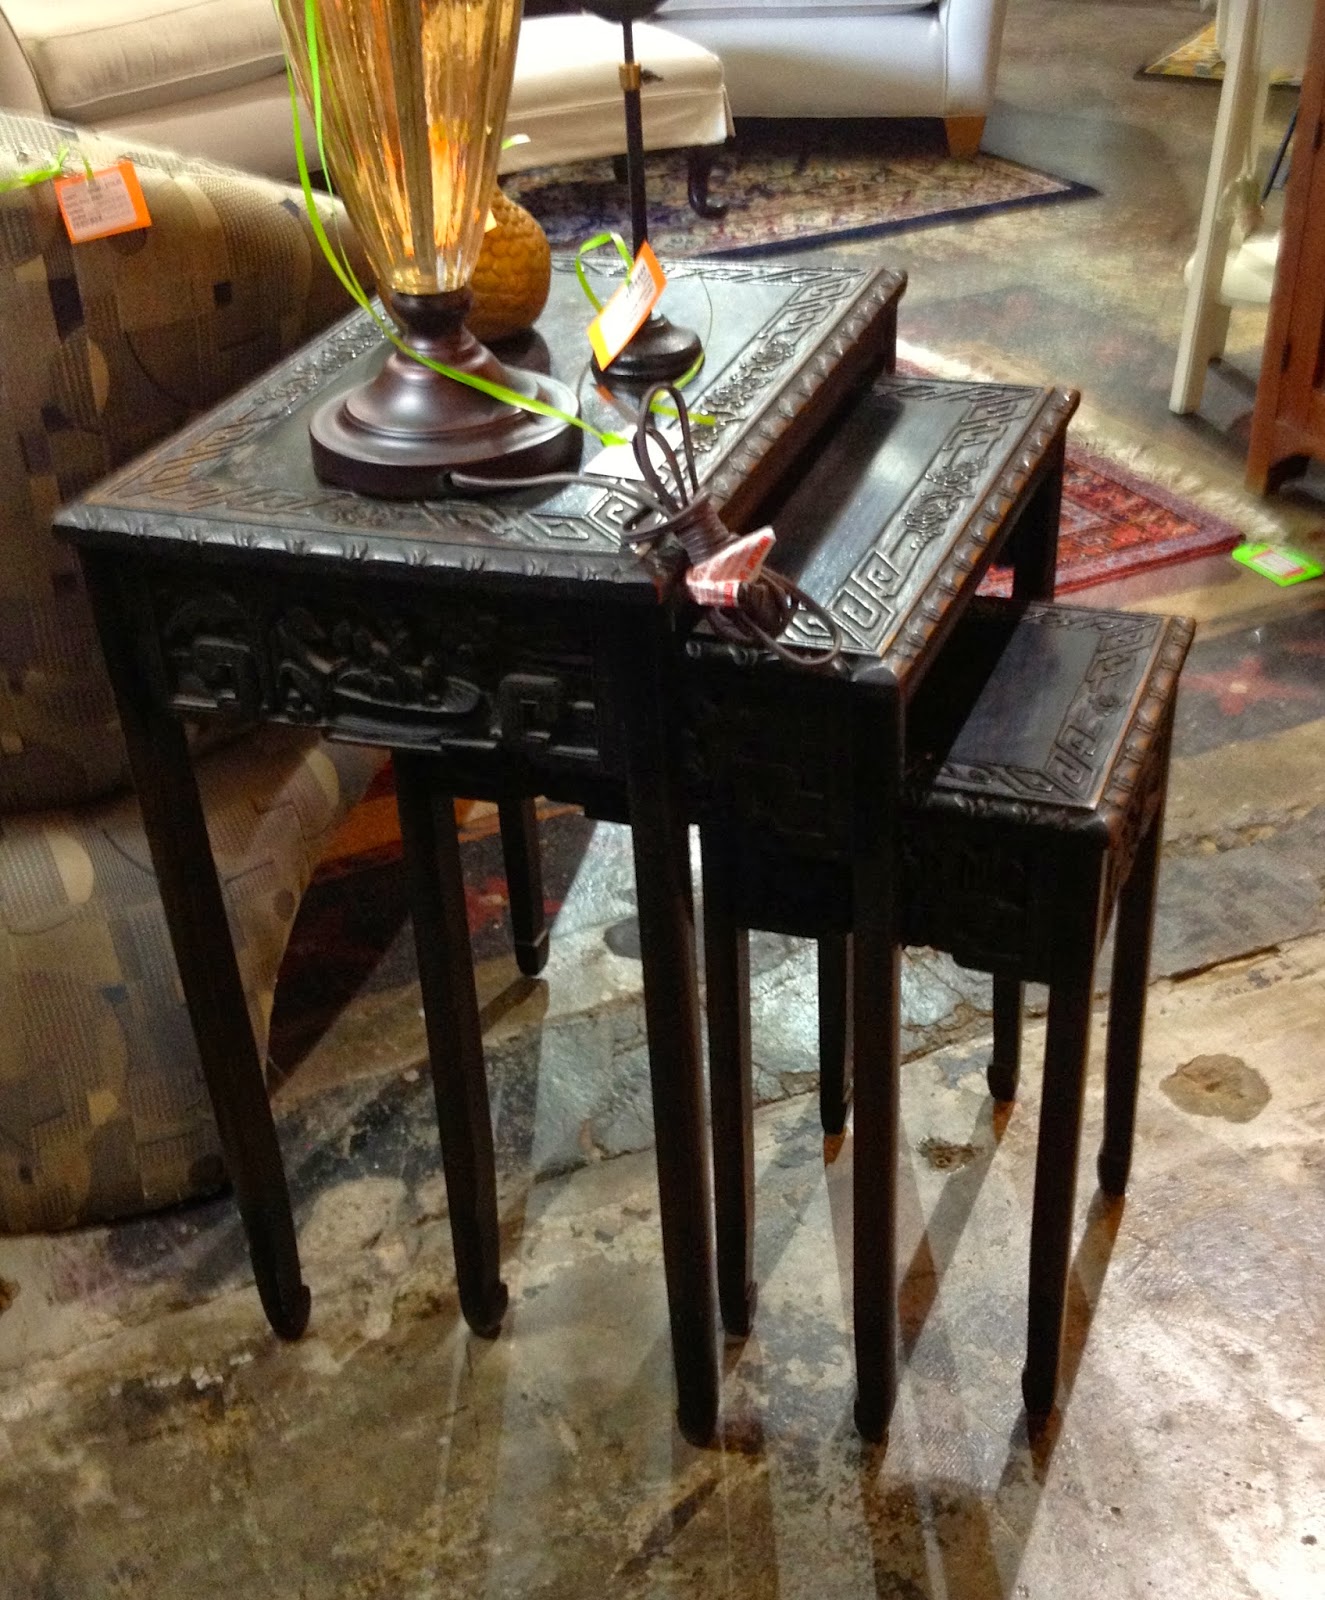
These handsome nesting tables will go in between the club chairs, a perfect spot for them to show off the intricate carving from nearly all angles.  I love how different they are-- the carving, the super dark espresso color, those legs!  


 We got a pair of these gold lamps for a steal at a second hand place, and they'll be perfect on either side of the couch.


While some of the older student townhouses have pretty bamboo floors throughout the space, ours only has them upstairs, and in the first floor living area we've got tile.  It's not as pretty (although not hideous, either), but the main problem is how it makes the whole downstairs feel cold and echoey.  So to warm up the space we decided to go with a big natural fiber rug, large enough to cover the entire surface area of the living and dining spaces.  We picked out a gorgeous basket weave design, which will add some pattern and texture to the rug while keeping the neutral, relaxed feel we've been shooting for.


Upstairs in the master bedroom we realized we had enough extra space for a vanity and chair and love the combination of this cane back armchair and the painted table below (the color is a bit washed out in the photo-- it's a pretty pale blue in person).


 We're going for a more feminine feel in the bedroom with light, airy colors and a bit more of a French feel.  For Vivian's bedside lighting we found this gorgeous pair of alabaster lamps with a beautiful soft gray marbled effect.  


When we got stuck and couldn't find the right thing, Vivian discovered these pretty bedside tables on Etsy, which are just perfect for the feel of the bedroom.  Love them.


We searched for ages for a headboard, for a long time thinking of going with something brass-- until we found this guy.  It wasn't being sold as a headboard-- just a mirror-- but it fits the dimensions of the king sized bed perfectly, and how fabulous will it be once we get the base built and it's installed??


Have a great weekend, and happy Friday!

xo

Liza
Related Posts Plugin for WordPress, Blogger...